Table of Contents
ToggleKey Takeaways
- Procedure Overview: Dental implants involve surgically placing a titanium post in the jawbone to support a replacement tooth, a multi-stage process for a permanent, natural solution.
- Pain Management: Discomfort is generally less than expected, akin to an extraction, managed with local anesthesia during and pain relievers after.
- Anesthesia Options: Local anesthesia is common (patient awake), but sedation options are available for anxiety or complex cases.
- Recovery Timeline: Initial healing takes days to a week; full bone integration (osseointegration) takes several months. Aftercare is crucial.
- Temporary Solutions: Patients usually receive temporary teeth, ensuring no prolonged “toothless” periods during healing.
- Overall Duration: The complete journey can range from a few months to over a year, varying with individual needs like bone grafting.
Implant Procedure: Your Comprehensive Guide to a New Smile
Losing a tooth, or several, can feel like a significant chapter closing. Perhaps it’s an old sporting injury finally catching up, a dental issue that went a little sideways, or simply the relentless march of time. Whatever the backstory, the gap left behind isn’t just physical; it can chip away at confidence, alter how you eat, speak, and even how freely you share your laugh with the world. But here’s the brilliant twist: dental implants aren’t just a replacement; they’re a resurrection. They offer a chance to reclaim not just the aesthetics of a full smile, but the robust functionality of natural teeth. Think of them as the unsung heroes of modern dentistry, working silently beneath the surface to provide unparalleled support and durability. This guide is your all-access pass, designed to demystify the entire implant procedure, answer those nagging questions buzzing in your mind, and arm you with the knowledge to embark on this journey with clarity and confidence. We’re talking benefits that go far beyond the mirror – improved speech, enhanced comfort, the sheer joy of eating your favourite foods without a second thought, a boost to your self-esteem, and a significant contribution to your long-term oral health. Let’s get started.
What Exactly is an Implant Procedure and What Does It Entail?
An implant procedure fundamentally entails the surgical placement of a titanium post into your jawbone, which then acts as a robust anchor for a replacement tooth or teeth, aiming to restore both function and aesthetics seamlessly. Think of it less as a mere filling of a space and more as a sophisticated bio-engineering marvel that mimics the natural root system of a tooth. The “implant” itself is typically a small, screw-shaped cylinder made from medical-grade titanium, a material renowned for its biocompatibility – meaning your body readily accepts it, allowing bone to fuse directly onto its surface in a process called osseointegration. This fusion is the secret sauce, creating a foundation that’s as sturdy, if not sturdier, than the original tooth root.
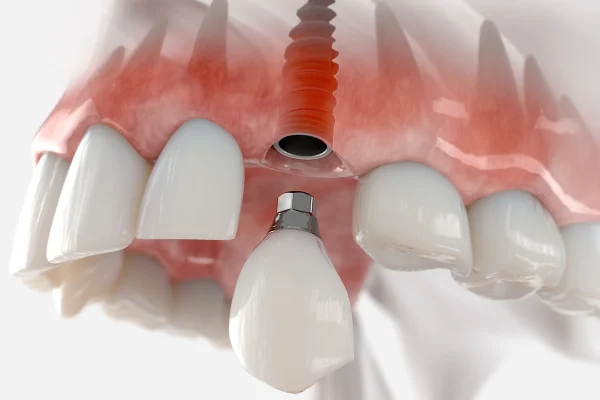
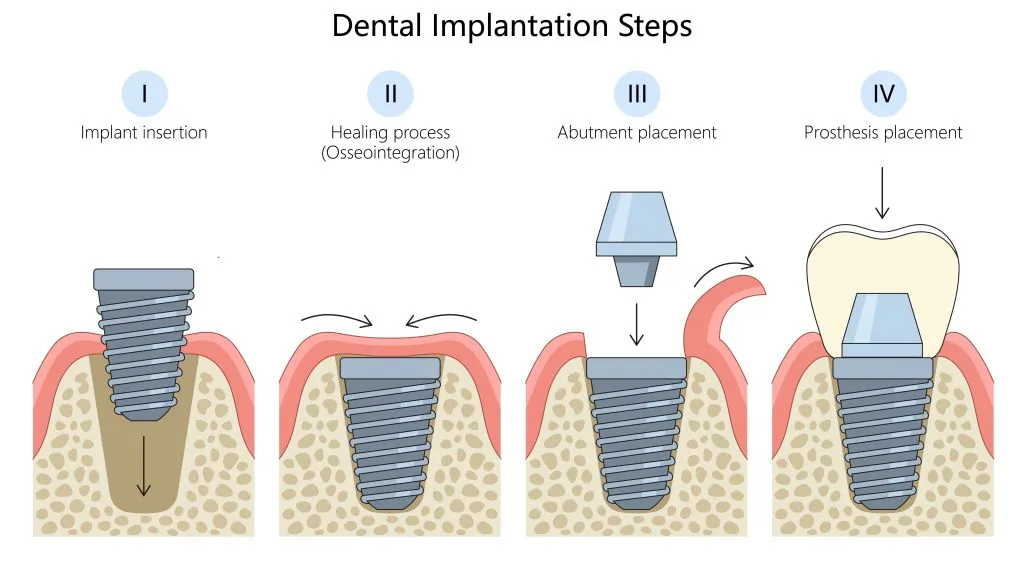
The overall goal is ambitious yet consistently achievable: to provide a permanent, fixed solution for missing teeth that feels, functions, and looks entirely natural. It’s about moving beyond temporary fixes or appliances that might slip or cause discomfort. The procedure typically involves a few key components working in concert. First, there’s the implant fixture, the titanium post surgically embedded into the jaw. Once this has healed and integrated, an abutment is attached. This is a small connector piece that protrudes just above the gum line, serving as the docking station for the final piece of the puzzle: the crown. The crown is the visible, tooth-shaped part, meticulously crafted to match the colour, shape, and size of your surrounding natural teeth, making it virtually indistinguishable. It’s important to grasp that this isn’t a one-and-done appointment; it’s a carefully orchestrated multi-step process, a journey rather than a sprint, designed for precision, optimal healing, and long-term success. Each step is crucial, building upon the last to achieve that final, confident, and fully functional smile.
What is the Typical Process for Dental Implants from Start to Finish?
The typical process for dental implants, from your initial chat with the dentist to flaunting your final, gleaming restoration, is a carefully orchestrated multi-phase journey involving assessment, precise treatment planning, the implant placement itself, a crucial healing period for osseointegration, abutment connection, and finally, the fitting of your custom-made crown. This isn’t a rushed affair; think of it as commissioning a bespoke piece of art, where every detail matters for the final masterpiece. The journey kicks off with an in-depth initial consultation and assessment. Here, your dentist becomes part detective, part architect, evaluating your oral health, discussing your medical history, and understanding your aesthetic goals. This often involves advanced imaging, like X-rays or even a 3D CBCT scan, to get a crystal-clear picture of your jawbone’s density and structure.
Following this, treatment planning takes centre stage. This is where the roadmap to your new smile is meticulously drawn up. Your dentist will discuss the number of implants needed, the type of restoration (a single crown, a bridge, or even implant-supported dentures), and the projected timeline. Then comes the implant placement surgery. Don’t let the word ‘surgery’ send shivers down your spine; it’s a precise, often surprisingly quick procedure performed under local anaesthesia. The titanium implant is gently placed into the pre-prepared site in your jawbone. Next is the all-important healing and osseointegration phase. This is where the magic happens, as your jawbone naturally grows around and fuses with the titanium implant, locking it securely in place. This biological hug can take anywhere from a few weeks to several months, depending on individual healing factors. Once osseointegration is complete, the abutment placement follows. This small connector is attached to the implant, creating the base for your new tooth. Finally, it’s time for the crown fitting. Impressions of your mouth are taken to craft a custom crown that blends seamlessly with your natural teeth in colour, shape, and size. This crown is then securely attached to the abutment, and voila – your new smile is complete. While this outlines the general sequence, it’s crucial to remember that timelines can, and often do, vary significantly per individual, tailored to their unique clinical needs and healing pace.
What’s Involved in Having a Dental Implant Placed? (The Core Step – Stage 3 Explained)
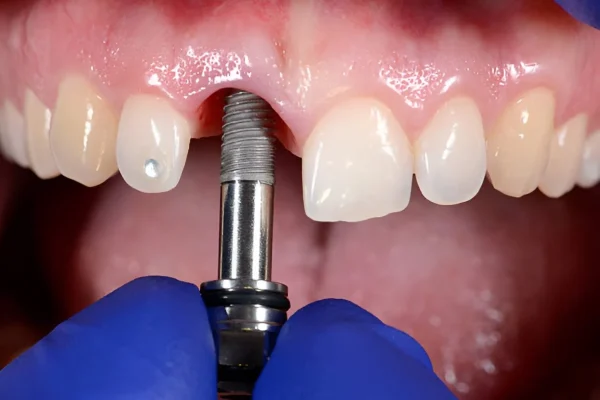
Having a dental implant placed, the pivotal core step of the journey (often referred to as Stage 3), involves your surgeon meticulously making a small incision in your gum, preparing a precise space within the jawbone, and then expertly inserting the titanium implant, before carefully suturing the gum tissue. This is the moment the foundation for your new tooth is quite literally laid. While it sounds intensive, the procedure is remarkably refined and patient comfort is paramount. First, the area is thoroughly numbed using local anaesthesia, ensuring you won’t feel any pain during the process – perhaps just some pressure or vibration, akin to other routine dental work.
Once you’re comfortable and the anaesthetic has taken full effect, the surgeon makes a small, precise incision in the gum tissue to expose the underlying jawbone at the predetermined site. This isn’t a large opening; it’s just enough to allow access for the next steps. Using a series of specialized, very gentle drills of increasing diameter, the surgeon then creates a carefully calibrated osteotomy – a small, cylindrical hole or channel in the jawbone. The depth and width of this channel are meticulously planned based on your pre-operative scans to perfectly accommodate the chosen implant. There’s no guesswork here; it’s all about precision. The titanium implant, which looks like a small, high-tech screw, is then gently and slowly threaded or tapped into this prepared site. The aim is to achieve what’s known as primary stability – a snug, secure fit from the outset. In some cases, a healing cap or a temporary abutment might be placed on top of the implant at this stage. Finally, the gum tissue is repositioned and closed with fine sutures (stitches) to protect the implant and allow the area to heal undisturbed. You’ll receive clear post-operative instructions regarding care, and while the thought of a “core step” like this might seem daunting, most patients are pleasantly surprised by how straightforward and manageable the experience is, especially with the reassurance that comprehensive pain management strategies are always in place for both during and after the procedure.
Understanding the Stages of Your Dental Implantation Journey
Understanding the stages of your dental implantation journey reveals a meticulously planned sequence, designed to ensure every aspect, from initial assessment to final restoration, contributes to a successful, long-lasting outcome and a confident new smile. This isn’t a one-size-fits-all scenario; it’s a bespoke process tailored to your individual anatomy and dental needs. Each stage plays a critical role, like chapters in a well-written novel, each building on the last to reach a satisfying conclusion. Skipping or rushing a stage would be like trying to build a house without proper foundations – the end result simply wouldn’t stand the test of time. The beauty of this staged approach lies in its thoroughness. It allows for careful evaluation, precise execution, and, crucially, adequate time for your body to heal and adapt, particularly during the osseointegration phase where the implant becomes one with your jawbone.
Think of the initial stages – assessment and planning – as the architectural blueprints and site surveys. Without these, the actual construction (implant placement) would be haphazard. Then comes the placement itself, the laying of that crucial foundation. If bone grafting is needed, that’s an essential preparatory step, like ensuring the ground is perfectly level and stable before building. The healing phase is nature’s work, diligently knitting bone to implant. Finally, the restorative stage is the grand unveiling, where the custom-crafted tooth is placed, completing the structure. Each transition between stages is monitored, ensuring everything is progressing as it should. This structured progression not only maximizes the chances of a successful, durable implant but also allows you, the patient, to be fully informed and comfortable at every step. It’s a collaborative effort between you, your dental team, and your body’s natural healing capabilities, all working towards a shared goal: a healthy, functional, and aesthetically pleasing smile that can last a lifetime.
What Happens During the Pre-operative Assessment for Teeth Implantation? (Stage 1)
During the pre-operative assessment for teeth implantation, which is the foundational Stage 1, your dental team conducts a thorough evaluation including a detailed review of your medical and dental history, advanced imaging like X-rays or CBCT scans, and precise impressions of your mouth, all to meticulously plan your treatment and ensure you’re a prime candidate for success. This initial deep dive is absolutely paramount; it’s where the groundwork for your entire implant journey is laid. Your dentist isn’t just looking at the gap where a tooth used to be; they’re assessing the bigger picture of your oral and general health. You’ll discuss your medical history in detail – any existing conditions, medications you’re taking, allergies – as these can all influence treatment planning and healing. Similarly, your dental history provides valuable context.
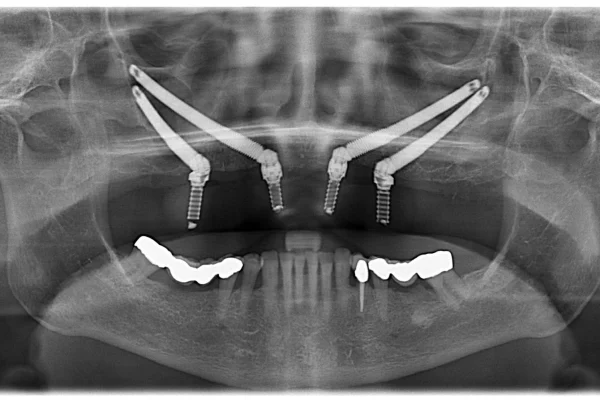
A comprehensive dental examination is next. This involves checking the health of your remaining teeth and gums, looking for any signs of gum disease or infection that need to be addressed before implant surgery can proceed. Then comes the crucial imaging. Standard dental X-rays, like panoramic views, give a good overview, but often, a Cone Beam Computed Tomography (CBCT) scan is the star of the show. This advanced 3D imaging provides incredibly detailed cross-sectional views of your jawbone, allowing your dentist to assess its height, width, and density with pinpoint accuracy. It also helps to identify the precise location of important anatomical structures like nerves and sinuses, ensuring the implant can be placed safely and effectively. Impressions (moulds) of your teeth and gums will likely be taken. These can be traditional putty impressions or modern digital scans, and they’re used to create models of your mouth, which aid in planning the ideal position and angulation of the implant and the design of your future crown. This stage is also your prime opportunity to ask every question under the sun. Your dentist will discuss the proposed treatment plan, outline the steps involved, explain the potential risks and benefits, and talk about costs and timelines. It’s all about ensuring you’re fully informed, comfortable, and confident before moving forward.
Is Bone Grafting Always Part of the Tooth Implant Process? (Stage 2 Explained)
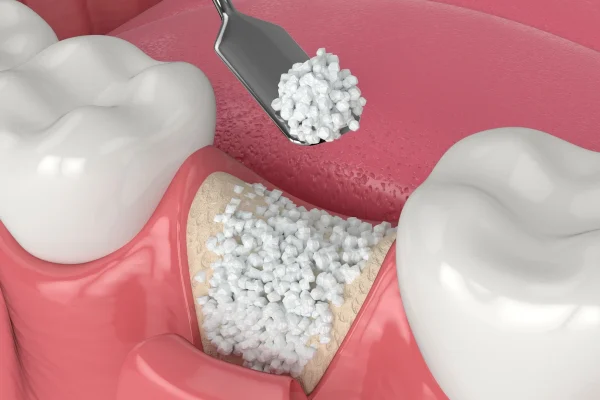
No, bone grafting is not always a mandatory part of the tooth implant process; it becomes a necessary Stage 2 procedure only when a patient presents with insufficient jawbone volume or density to securely support the dental implant. Think of your jawbone as the soil in which a tree (the implant) needs to be firmly rooted. If the soil isn’t deep or robust enough, the tree won’t be stable. Similarly, for an implant to achieve long-term success and withstand the forces of chewing, it needs a solid foundation of healthy bone. When a tooth is lost, the bone in that area, no longer stimulated by the tooth root, can begin to resorb or shrink over time. This can also happen due to prolonged gum disease, injury, or other factors. If a significant amount of bone has been lost, there might not be enough structure left to securely anchor an implant of the appropriate length and width.
This is where bone grafting comes into play. It’s a surgical procedure designed to rebuild or augment the jawbone, creating a more suitable environment for implant placement. The grafting material can come from various sources: your own bone (autograft, often taken from another area in your mouth or hip), donated human bone (allograft), animal bone (xenograft, typically bovine), or synthetic materials (alloplast). Your surgeon will determine the most appropriate type of graft material for your specific situation. The procedure itself typically involves placing the grafting material into the deficient area of the jaw. Over the following months, your body naturally replaces this graft material with your own new, healthy bone, effectively regenerating the lost volume. This healing period for the bone graft can take several months before the site is ready for the implant to be placed. So, while not everyone needs it, for those with compromised bone, grafting is an indispensable preparatory step that dramatically increases the predictability and success rate of the subsequent implant procedure, turning a potentially unsuitable candidate into a viable one.
What Does Restorative Treatment Involve After Your Implant Has Healed? (Stage 4)
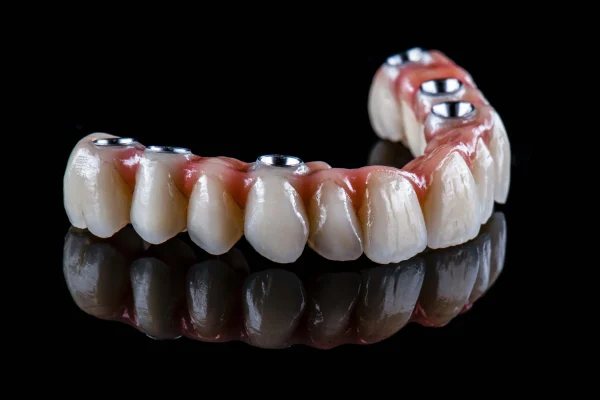
After your implant has successfully healed and fused with the jawbone through osseointegration, the restorative treatment (Stage 4) primarily involves attaching a connector piece called an abutment to the implant, followed by the precise creation and fitting of your final, custom-designed crown, bridge, or denture. This is the exciting stage where the visible, functional part of your new tooth comes to life, transforming that well-integrated implant post into something that looks, feels, and chews like the real deal. Once your dentist has confirmed that osseointegration is complete – meaning the implant is rock-solid and fully bonded with your bone, often verified with a gentle stability test or X-rays – the process of creating your new tooth can begin.
The first step in this restorative phase is usually the abutment placement. If a healing cap was placed over the implant during the initial surgery, it will be removed. The abutment, a small but crucial connector post, is then securely attached to the top of the implant. This piece protrudes slightly above the gum line and serves as the interface between the implant (hidden in the bone) and the final restoration (the visible tooth). Sometimes, the abutment is placed at the same time as the implant surgery, but often it’s a separate, minor procedure. With the abutment in place, new impressions of your mouth are taken. These highly accurate moulds capture the precise position of the abutment relative to your other teeth and the contours of your gums. These impressions are then sent to a specialized dental laboratory where skilled technicians will meticulously craft your custom crown, bridge, or denture. They pay incredible attention to detail, matching the shade, shape, and size to your natural teeth to ensure a seamless, aesthetically pleasing result. Finally, once your bespoke restoration is ready, you’ll return for the fitting appointment. Your dentist will try in the crown (or other restoration), checking the fit, bite, and appearance. Any necessary minor adjustments are made, and then it’s securely cemented or screwed onto the abutment. This is the moment of truth – your implant journey culminates in a fully restored, beautiful, and functional tooth.
How Painful is Getting a Dental Implant, Really?
Regarding how painful getting a dental implant is, most patients genuinely report significantly less discomfort than they anticipate, often equating the sensation during and after the procedure to that of a routine tooth extraction, thanks to effective local anesthesia and modern pain management strategies. The very idea of surgery in the mouth can conjure images of intense pain, but the reality of dental implant placement is typically far more manageable. During the actual procedure, you shouldn’t feel any pain at all. Your dentist will administer local anaesthesia to completely numb the specific area where the implant is being placed. You’ll be awake and aware, but the surgical site will be profoundly desensitized. You might feel some pressure or vibrations from the instruments, similar to what you’d experience during a filling, but sharp pain is off the table. Dentists are highly skilled in ensuring patient comfort, and they won’t proceed until they are certain the area is fully numb.
What about after the anaesthesia wears off? This is where some discomfort is to be expected, but it’s generally well-controlled. Most patients describe it as a dull ache, soreness, or tenderness around the implant site, possibly accompanied by some minor swelling or bruising. This is a normal part of the body’s healing response. The level of post-operative discomfort often depends on the complexity of the surgery – a single, straightforward implant might result in very little soreness, while multiple implants or procedures involving bone grafting might lead to a bit more. However, this discomfort is usually effectively managed with over-the-counter pain relievers like ibuprofen or paracetamol. For more extensive procedures, your dentist might prescribe stronger pain medication or anti-inflammatory drugs. Following post-operative care instructions diligently—such as applying ice packs, eating soft foods, and maintaining gentle oral hygiene—plays a huge role in minimizing pain and promoting swift healing. The overwhelming feedback from patients is that the temporary discomfort is a small price to pay for the long-term benefits of a secure, natural-feeling tooth.
Do They Put You to Sleep for Dental Implants or Are You Awake?
Whether they put you to sleep for dental implants or you remain awake largely depends on your preference, the complexity of your case, and the options your dental practice offers, with local anesthesia (keeping you awake but numb) being the most common, though various sedation options up to general anesthesia are available to ensure your complete comfort. The good news is, you have choices, and your dental team will work with you to select the best approach. The standard and most frequently used method for dental implant surgery, especially for single or straightforward multiple implants, is local anaesthesia. This is an injection that numbs the specific area of your mouth where the implant will be placed. You remain fully awake, conscious, and able to communicate with your dentist throughout the procedure, but you won’t feel any pain from the surgical site. You might sense pressure or vibrations, but not discomfort. This is very similar to the numbing you’d receive for a filling or a tooth extraction.
However, for patients who experience significant dental anxiety, have a strong gag reflex, are undergoing a particularly long or complex procedure (like full mouth reconstruction with multiple implants), or simply prefer to be more relaxed, sedation dentistry offers excellent solutions. These can range from mild to deep relaxation:
- Oral Sedation: You’d take a prescribed sedative pill shortly before your appointment. This makes you feel drowsy and very relaxed, though you’re still conscious and can respond to instructions.
- Nitrous Oxide (Laughing Gas): Inhaled through a small mask over your nose, nitrous oxide induces a state of calm and relaxation quickly. You remain awake, and its effects wear off rapidly once the gas is stopped.
- Intravenous (IV) Sedation: Administered directly into a vein, IV sedation provides a deeper level of relaxation, often described as “twilight sleep.” You’ll be extremely relaxed, possibly drifting in and out of a light sleep, and will likely have little to no memory of the procedure afterwards. You’re still technically conscious and can respond, but you’re in a profound state of calm.
Finally, general anaesthesia, where you are completely unconscious (fully “asleep”), is much less common for routine dental implant procedures. It’s typically reserved for very extensive surgical cases, patients with certain medical conditions, or those with extreme phobias where other sedation methods are insufficient. This requires more specialized monitoring and is often performed in a hospital setting or a clinic equipped for general anaesthesia. The key is to have an open conversation with your dentist about your anxieties and preferences. They can explain the pros and cons of each option and help you choose the one that ensures your implant experience is as stress-free and comfortable as possible.
What is the Recovery and Aftercare Like Post-Implant Surgery?
The recovery and aftercare post-implant surgery typically involve a period of manageable healing characterized by common symptoms like localized swelling, minor bruising, and some discomfort, all of which are greatly mitigated by diligently following your dentist’s specific post-operative instructions. Think of it as your body’s natural response to a minor surgical procedure; it needs a little time and care to mend itself beautifully. Immediately after the surgery, and for the first few days, it’s normal to experience some swelling around the implant site, and sometimes extending to the cheek or under the eye, depending on the implant’s location. Bruising may also appear on the skin, again, typically minor and fading within a week or so. Discomfort or soreness is also common once the local anaesthesia wears off. This is usually well-managed with over-the-counter pain relievers (like ibuprofen or acetaminophen) or, if needed, prescription pain medication provided by your dentist. Some minor bleeding or oozing from the surgical site can occur for the first 24-48 hours, which can often be controlled by gently biting on a clean gauze pad.
The cornerstone of a smooth recovery is adherence to your dentist’s aftercare advice. This will likely include:
- Oral Hygiene: Gentle rinsing with a prescribed antimicrobial mouthwash or a warm salt-water solution usually starts the day after surgery to keep the area clean. You’ll be advised on how to brush your other teeth carefully, avoiding the surgical site initially.
- Diet: A soft food diet is typically recommended for the first few days to a week to avoid putting pressure on the implant and irritating the healing tissues. Think soups, yoghurts, mashed potatoes, smoothies – anything that doesn’t require strenuous chewing.
- Pain and Swelling Management: Applying ice packs to the outside of your face over the affected area for short intervals (e.g., 20 minutes on, 20 minutes off) during the first 24-48 hours can significantly reduce swelling and discomfort.
- Activity: Rest is important, especially on the day of surgery. Strenuous physical activity should be avoided for a few days as it can increase bleeding and swelling.
- Medications: Take any prescribed antibiotics or pain medications exactly as directed.
- Follow-up Appointments: Attend all scheduled follow-up appointments so your dentist can monitor your healing progress and remove sutures if necessary.
By carefully following these guidelines, most patients find the recovery period quite tolerable, with the initial symptoms subsiding significantly within a week, paving the way for the longer-term healing of osseointegration.
How Long Does It Typically Take to Recover From Dental Implant Surgery?
It typically takes a few days to a week for the initial recovery from dental implant surgery, where discomfort and swelling subside, but the complete fusion of the implant with your jawbone—a process called osseointegration—requires several months before the final restoration can be placed. It’s helpful to think of recovery in two distinct phases. The first is the short-term, initial healing phase. This is what most people immediately associate with “recovery” – the period when any post-operative symptoms like swelling, bruising, and soreness are most noticeable and then gradually diminish. For a straightforward single implant, you might feel largely back to normal within 3 to 5 days, though some tenderness could linger for a week or so. If multiple implants were placed, or if bone grafting was performed concurrently, this initial phase might extend a bit longer, perhaps 7 to 14 days, before you’re feeling substantially more comfortable. During this time, adhering to soft food recommendations and gentle oral hygiene is key.
The second, and equally crucial, phase is the long-term healing and osseointegration phase. This is the quiet, invisible workhorse part of the recovery. Osseointegration is the biological process where your jawbone cells grow directly onto the titanium surface of the implant, effectively locking it into place and making it a permanent part of your jaw. This is what gives dental implants their incredible stability and strength. This vital fusion process typically takes anywhere from 3 to 6 months, or sometimes longer, depending on various factors. These factors include your overall health (smokers or individuals with certain systemic conditions like uncontrolled diabetes may heal more slowly), the quality and density of your jawbone at the implant site, whether a bone graft was needed (grafts require their own healing time), and the number of implants placed. Your dentist will monitor this process, often with periodic check-ups or X-rays, to determine when the implant is sufficiently integrated and stable enough to support the final abutment and crown. So, while you’ll likely feel recovered relatively quickly, the biological clock for full integration ticks at its own pace, ensuring a robust foundation for your new tooth.
What Foods Should You Not Eat After Getting Dental Implants to Ensure Proper Healing?
To ensure proper healing after getting dental implants, you should not eat foods that are hard, crunchy, chewy, sticky, overly spicy, or very hot, as these can irritate the surgical site and potentially compromise the implant’s stability during the crucial initial healing phase. Your mouth has just undergone a precise surgical procedure, and the area around the new implant is tender and needs to be treated with care. Think of it like protecting a delicate new seedling – you wouldn’t subject it to harsh conditions. For the first few days to a week (or as advised by your dentist), your diet should be your ally in healing.
Here’s a more detailed look at the culinary culprits to sidestep:
- Hard Foods: Nuts, hard candies, ice cubes, popcorn (especially those unpopped kernels!), raw carrots, or apples. These require significant biting force and can put undue stress on the implant site or even dislodge a healing cap.
- Crunchy Foods: Crisps, pretzels, crusty bread, seeds, and granola. Small, sharp particles can easily get lodged in the surgical site, causing irritation, inflammation, or infection.
- Chewy Foods: Tough meats like steak, chewy sweets like caramels or toffees, bagels, or very chewy bread. The repetitive motion and force of chewing these can strain the healing tissues.
- Sticky Foods: Gummy sweets, dried fruits, peanut butter (in large amounts). These can adhere to the surgical site or pull on sutures.
- Spicy Foods: Curries, hot sauces, chillies. These can cause a burning sensation and irritate the sensitive healing gums.
- Very Hot Foods and Drinks: Soups, coffee, tea that are scalding hot. These can burn the tender tissues and increase inflammation. Let them cool to a lukewarm temperature.
- Acidic Foods: Citrus fruits and juices, tomatoes. These can sometimes cause stinging or irritation at the surgical site.
Instead, embrace a diet of soft, nourishing foods: lukewarm soups, broths, mashed potatoes, scrambled eggs, yogurt, smoothies (but avoid using straws for the first few days as the suction can disturb the blood clot), oatmeal, soft cooked vegetables, fish, and pasta. As your comfort level increases and your dentist gives the green light, you can gradually reintroduce more textured foods back into your diet. Patience with your plate pays dividends in implant success.
What Does “After Your Dental Implant Treatment in Southampton” (or Similar Post-Op Care) Usually Entail?
Post-operative care after your dental implant treatment, whether in Southampton, Seattle, or Sydney, usually entails a set of crucial instructions focused on maintaining excellent oral hygiene with gentle techniques, effectively managing any swelling and discomfort, adhering to dietary recommendations, and attending all scheduled follow-up appointments to monitor healing. While the specific branding like “After Your Dental Implant Treatment in Southampton” might point to a particular clinic’s patient leaflet, the core principles of post-implant care are universally recognized and essential for a smooth recovery and successful outcome. These instructions are your roadmap to ensuring the implant site heals optimally and integrates properly with your jawbone.
Key elements generally include:
- Oral Hygiene Protocol: This is paramount. You’ll likely be advised to avoid vigorous rinsing or spitting for the first 24 hours to protect the initial blood clot. After that, gentle rinsing with a warm salt-water solution (half a teaspoon of salt in a cup of lukewarm water) or a prescribed antimicrobial mouthwash, several times a day, especially after meals, helps keep the area clean and reduces bacteria. You’ll be shown how to brush your other teeth normally but to be very gentle or avoid direct brushing on the surgical site for a specified period, perhaps using a soft-bristled brush when you do start.
- Swelling and Bruising Management: Applying an ice pack or cold compress to the outside of your face, over the surgical area, for 15-20 minute intervals during the first 24-48 hours is often recommended to minimize swelling. Some bruising is normal and will fade.
- Pain Control: Over-the-counter analgesics like ibuprofen or paracetamol are usually sufficient. Your dentist will advise on dosage and may prescribe stronger pain relief if your procedure was more extensive.
- Dietary Guidelines: A soft food diet is standard for the initial healing period (typically a few days to a week). This prevents undue stress on the implant and avoids irritating the gums.
- Activity Levels: Rest is important on the day of surgery. Avoid strenuous exercise or heavy lifting for a few days, as this can increase blood pressure and potentially lead to more bleeding or swelling at the surgical site.
- Avoiding Irritants: Smoking is a major no-no as it significantly impairs healing and increases the risk of implant failure. Alcohol should also be avoided or limited during the initial healing phase.
- Suture Care (if applicable): If non-dissolvable sutures were used, you’d have an appointment for their removal, typically 7-14 days post-surgery.
- Medication Adherence: If prescribed antibiotics, it’s crucial to complete the entire course, even if you feel fine.
- Follow-Up Appointments: Attending all scheduled check-ups allows your dentist to monitor healing, address any concerns, and ensure everything is progressing as planned.
This diligent aftercare, regardless of geographical location, is fundamental to the long-term success of your dental implant.
How Long Will My Journey Towards Dental Implants Take?
Your journey towards dental implants can take anywhere from a few months to over a year to complete from the initial consultation to the final placement of your new tooth, with the exact duration heavily dependent on individual factors such as your body’s healing capacity and whether preparatory procedures like bone grafting are required. There’s no single, fixed timeline that applies to everyone; it’s a highly personalized process. For a patient with excellent oral health, sufficient jawbone density, and requiring a straightforward single implant, the process might be on the shorter end. This could involve the implant placement, a healing period of perhaps 3 to 4 months for osseointegration, followed by the abutment and crown placement. In such ideal scenarios, you might be looking at a total timeframe of around 4 to 6 months.
However, many patients require additional steps that can extend this timeline. The most common factor is the need for bone grafting. If your jawbone isn’t dense or voluminous enough to support an implant, a bone graft procedure will be necessary first. The graft itself needs several months (typically 4 to 9 months, sometimes longer) to heal and integrate before the implant can even be placed. This, naturally, adds significant time to the overall journey. Similarly, if a tooth needs to be extracted before an implant can be placed, there might be a healing period required after the extraction, before the implant site is ready. Some patients opt for immediate implant placement (at the same time as extraction), but this isn’t suitable for all cases. Other factors influencing the duration include your body’s individual healing rate (which can be affected by age, general health, and lifestyle choices like smoking), the number of implants being placed (a full mouth reconstruction will invariably take longer than a single tooth), and the specific type of implant procedure being performed. Your dentist will provide you with a personalized, estimated timeline during your initial consultation, outlining all the anticipated stages and their approximate durations, so you have a clear understanding of the commitment involved.
How Long Does It Take to Fit One Dental Implant During the Actual Surgery?
During the actual surgery, it typically takes about 30 minutes to an hour to fit one dental implant in a straightforward case, although this timeframe can extend if multiple implants are being placed or if the procedure involves more complex surgical considerations. It’s often surprising to patients how relatively quick the surgical placement of a single implant can be, especially when they’ve mentally prepared for a much longer ordeal. The efficiency stems from meticulous pre-operative planning and the precision of modern dental techniques and instruments. Your surgeon will have already studied your X-rays and 3D scans, pinpointing the exact location, depth, and angulation for the implant. This preparation means that on the day of surgery, the focus is purely on the skilled execution of that plan.
The surgical appointment itself will, of course, include time for administering local anaesthesia and ensuring you’re completely numb and comfortable, as well as sterile draping of the area. The actual “hands-on” time for placing the implant – making the incision, preparing the osteotomy (the channel in the bone), and inserting the implant – is often completed within that 30 to 60-minute window for a single, uncomplicated placement. If, for instance, two or three implants are being placed in easily accessible areas with good bone quality, the total surgical time might extend to around 1.5 to 2 hours. More complex cases, such as those requiring immediate bone grafting at the time of implant placement, or procedures involving sinus lifts, will naturally take longer due to the additional steps involved. The key takeaway is that the surgical part, while critical, is often a surprisingly swift component of the overall implant journey, thanks to advanced planning and techniques. Your dentist will always give you a clear estimate of the anticipated surgical time for your specific procedure.
How Long After a Tooth Extraction Can an Implant Typically Be Done?
An implant can typically be done anywhere from immediately at the time of tooth extraction to several months later, with the decision on timing—whether immediate, early, or delayed placement—being carefully determined by your dentist based on factors like the presence of infection, bone quality at the extraction site, and overall healing conditions. There isn’t a one-size-fits-all answer, as the ideal timing is highly dependent on the specific clinical situation of the extracted tooth site.
Here are the common approaches:
- Immediate Implant Placement: In certain ideal circumstances, the dental implant can be placed into the fresh extraction socket on the very same day the tooth is removed. This is often preferred when possible because it can reduce the total number of surgical procedures and potentially shorten the overall treatment time. Key conditions for immediate placement include an absence of acute infection at the extraction site, sufficient bone to stabilize the implant initially, and intact socket walls.
- Early Implant Placement (Soft Tissue Healing): Sometimes, it’s better to wait a short period, typically 4 to 8 weeks, after the tooth extraction. This allows the gum tissue over the socket to heal and close, providing a healthier soft tissue environment for implant surgery. The underlying bone, however, has not yet fully remodeled. This approach is often chosen if there was a minor infection or if better soft tissue closure is desired before implant placement.
- Delayed Implant Placement (Partial Bone Healing): In other cases, a longer waiting period of around 12 to 16 weeks (3-4 months) might be recommended. This allows for more significant bone fill within the extraction socket, potentially providing a more robust foundation for the implant, especially if there was some bone loss around the extracted tooth.
- Late Implant Placement (Complete Bone Healing/Grafted Site Healing): If there was significant bone loss, a severe infection, or if a separate bone grafting procedure was performed to rebuild the site after extraction, the implant placement will be delayed for a longer period, often 4 to 9 months or more. This ensures the grafted bone has fully integrated and the site is optimally prepared to receive the implant.
Your dentist or oral surgeon will thoroughly evaluate the extraction site, often using X-rays or CBCT scans, to assess the bone quality and quantity, check for any infection, and then recommend the most appropriate timing for your implant placement to maximize the chances of long-term success.
Will I Be Without Teeth? Understanding the Interim Period During Implantation
You will generally not be without teeth during the implantation period, as dentists can provide various temporary solutions to maintain your smile’s appearance and functionality while your implant integrates with the jawbone, ensuring you can face the world confidently. This is a very common and understandable concern for anyone considering dental implants, especially if the missing tooth or teeth are in a visible part of their smile. The good news is that modern dentistry is well-equipped to manage this interim phase aesthetically and functionally. The goal is to ensure that while your implant is quietly healing beneath the gums and fusing with your jawbone (osseointegration), you don’t have to endure an unsightly gap or struggle significantly with eating and speaking.
The specific type of temporary restoration will depend on several factors, including the location of the implant(s), the number of teeth missing, your overall oral health, and your personal preferences. Your dentist will discuss the most suitable options with you during the treatment planning stage. For instance, if an implant is placed in a non-aesthetic area at the back of the mouth, and it doesn’t significantly impact your chewing or appearance, some patients might opt to go without a temporary tooth for that specific site. However, for front teeth or multiple missing teeth, a temporary solution is almost always provided. These temporary solutions are designed to be comfortable and look natural, allowing you to carry on with your daily life with minimal disruption while the all-important healing process takes place beneath the surface. So, rest assured, the journey to a permanent, beautiful implant-supported smile doesn’t usually involve a prolonged period of “toothlessness.”
How Long Do You Usually Go Without Teeth When Getting Implants?
You usually do not have to go without teeth for any significant length of time when getting implants, as temporary restorations can often be provided immediately or very shortly after the implant placement, though the specifics depend on the implant’s location and the type of temporary solution deemed most appropriate for your case. The dreaded thought of navigating daily life with a conspicuous gap in your smile is a major anxiety for many considering implants, but it’s largely an unfounded fear in most scenarios. If a tooth is extracted and an implant is placed immediately, or if an existing gap is being filled, your dentist will almost always have a plan for a temporary tooth or teeth, especially if the site is visible.
For implants in highly aesthetic zones (like your front teeth), a temporary solution is often put in place on the same day as the implant surgery. This could be a temporary crown attached to the implant itself (if it has enough initial stability, known as immediate loading or provisionalization), or more commonly, a removable temporary device like a partial denture or an Essix retainer. There might be very brief periods during the transition between stages – for example, a few hours between an extraction and the fitting of an immediate temporary, or during an appointment where impressions are taken for a lab-fabricated temporary – but these are typically minimal. If an implant is placed in a less visible area at the back of the mouth, and it doesn’t greatly affect your chewing or appearance, some patients, in consultation with their dentist, might choose to forego a temporary tooth for that specific site to simplify the healing process. However, even in these cases, if the patient desires a temporary, options can usually be explored. The key is that your dental team understands the importance of both function and aesthetics during the healing phase and will work with you to ensure the “toothless” period is either non-existent or exceptionally brief and manageable.
Do You Get Temporary Teeth While Waiting for Permanent Implants?
Yes, you very often get temporary teeth while waiting for your permanent implants to be ready, with common options including temporary crowns, removable partial dentures, clear Essix retainers with a false tooth, or even temporary bonded bridges, depending on your specific clinical situation and aesthetic needs. Dentists understand that aesthetics and function are crucial, even during the healing phase of implant treatment, so “going without” is rarely the default option, especially for visible teeth. These temporary solutions, often called “provisionals,” serve several important purposes: they maintain your smile’s appearance, allow for more comfortable eating and speaking, prevent adjacent teeth from shifting into the gap, and help shape the gum tissue for an optimal final result.
The type of temporary tooth provided will vary:
- Temporary Crown: In some cases, particularly with immediate implant placement where the implant has excellent initial stability, a temporary crown can be attached directly to the implant or a temporary abutment on the same day as surgery or shortly after. This is often a highly desirable option for front teeth.
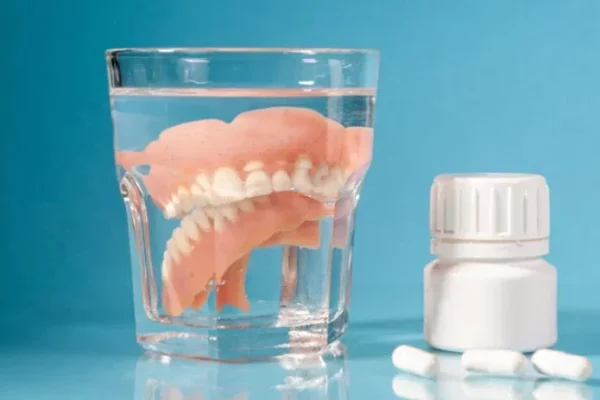
- Removable Partial Denture (Flipper): This is a common and cost-effective solution. It’s a small, removable acrylic appliance with one or more artificial teeth that fills the gap. It typically has small clasps that grip onto adjacent natural teeth for stability.
- Essix Retainer with Pontic: This looks like a clear aligner (similar to Invisalign) but has a tooth-coloured prosthetic tooth (pontic) embedded within it to fill the space of the missing tooth. It’s aesthetically pleasing and removable for cleaning.
- Temporary Bonded Bridge (Resin-Bonded Bridge): If there are healthy teeth on either side of the gap, a temporary tooth can sometimes be bonded to them using dental resin and small “wings.” This is a fixed (non-removable by the patient) option.
- Existing Denture Modification: If you already wear a denture, it can often be modified to accommodate the healing implant site, sometimes with a soft reline material for comfort.
Your dentist will assess your individual needs, the location of the implant, the stability of the implant, and your bite to determine the most suitable and comfortable temporary solution to see you through the osseointegration period until your permanent, custom-crafted restoration is ready.
Frequently Asked Questions About ‘implant procedure’
Navigating the world of dental implants can bring up a flurry of questions. Here, we tackle some of the most common queries to give you quick, clear answers, with the understanding that more in-depth explanations are available in the sections above.
What Exactly is an Implant Procedure and What Does It Entail?
An implant procedure fundamentally entails the surgical placement of a titanium post into your jawbone, which then acts as a robust anchor for a replacement tooth or teeth. This process aims to seamlessly restore both the function and aesthetics of your natural smile, involving components like the implant, abutment, and final crown. (See detailed explanation above).
How Painful is Getting a Dental Implant, Really?
Most patients report significantly less discomfort than anticipated, often comparing it to a routine tooth extraction. Effective local anaesthesia ensures no pain during the procedure, and post-operative soreness is typically manageable with standard pain relievers. (See detailed explanation above).
What Are the Key Stages of Your Dental Implantation Journey?
The key stages include an initial assessment and planning phase, potential bone grafting if needed, the implant placement surgery itself, a healing period for osseointegration (bone fusion), abutment connection, and finally, the fitting of your custom-made crown or restoration. (See detailed explanation above).
How Long Does It Take to Fit One Dental Implant During the Actual Surgery?
For a straightforward case, the actual surgical time to fit one dental implant is typically about 30 minutes to an hour. This can be longer for multiple implants or more complex situations. (See detailed explanation above).
What’s Involved in Having a Dental Implant Placed? (The Core Step – Stage 3 Explained)
This core step involves the surgeon making a small incision in the gum, preparing a precise site in the jawbone, and then carefully inserting the titanium implant. The gums are then sutured to allow for healing. (See detailed explanation above).



![Dental-Implants-NHS-e1747325783549-1024×915[1] Dental-Implants-NHS-e1747325783549-1024x915[1]](https://dentale-albania.com/wp-content/uploads/elementor/thumbs/Dental-Implants-NHS-e1747325783549-1024x9151-1-r5xyg5ea74oh73k9z5uv5amgw2c45uxhewp2r8hqqo.webp)


